Thursday, December 21, 2006

Do you know where your water comes from?


Recently, my cub scout den was working on their Engineering Webelo Activity Badge and we made a visit to our town's water department. (This is a photo of the collage we generated about water after our visit and given to the Water Department as a thank you gift for taking the time to meet with us.) I'm not sure what the boys got out of the experience, but I sure learned a lot. Here in New England, the majority of people get their water out of the ground via wells (the same is true for our town). Once the water is pumped up, the pH levels must be adjusted, and then chlorinated. It was fascinating to see how the whole system works. We learned that to work in the Water Department you need to be knowledgeable with mechanics (machinery does break down from time to time), chemistry (the handling and fine balancing of chemicals), geology, computers (the whole system is monitored by computers), and law (a myriad of state and federal laws and regulations governing the use and "production" of water). Today, we take for granted that when we turn on the faucet something will come out and that it will be safe to drink. It certainly is a lesson for all of us to know the behind the scenes process that make our lives so comfortable. (Hint: watch the Discovery Channel's Dirty Jobs show sometime.) Maybe our next field trip should be to the Waste Water Treatment Facility - what goes in must come out.

Wednesday, December 20, 2006

Science Teachers - Free Movie Offer

The producers of An Inconvenient Truth have made 50,000 copies of this documentary on Global Warming available to teachers for free!! Beginning December 18, 2006 until January 18, 2007, these DVDs are available on a first come, first serve basis. Visit http://www.participate.net/ to register for your copy. You will need to provide the 9-digit Tax ID number of the school where you teach. Delivery will take 6-8 weeks. Also at this website you will find companion curriculum guides which you can download.

Thursday, December 14, 2006

Project WET-The Incredible Journey Water Cycle Game


This fall I had the opportunity to attend a teacher workshop sponsored by Projects WET, WILD and Learning Tree held at the Beaver Brook Association located in Hollis, NH. My fellow participants and I enjoyed a fantastic day conducting and learning how to teach environmental science in the perfect outdoor setting.
Recently, I used one of the workshop activities called "The Incredible Journey," in the classroom. The fourth graders I was working with had just begun a unit on the water cycle. First, we generated a list of where we can find water. Then I introduced the "Incredible Journey" activity and sent them off on their own water journey. Pictured here is their "journey journal." At each station they placed a colored bead on their lanyard to record where they had been. After 25 minutes of journeying we stopped to discuss where their journey had taken them. In this example, the journey of this water molecule began (the right side of the picture) in a plant (green bead), which then evaporated to the atmosphere through the process of transpiration, condensed into a cloud (white), snowed onto a glacier (yellow), melted into ground water (orange), flowed into a lake (purple), which flowed into a river (dark blue), which flowed into the ocean (light blue), where it stayed for a while (now why would that be?), evaporated into the atmosphere and became a cloud again (white), rained into a lake (purple), was drunk by an animal (red), which urinated (the kids kind of thought that was gross), then seeped into the soil (black), which was absorbed by the roots of a plant (green), which was lost through transpiration to the atmosphere (white), which is where this story began but which will continue and continue and continue which of course is the whole point!!! (Sorry for the run on sentence.) As a follow up activity, the students were asked to imagine that they were a water droplet and to write a descriptive tale of their journey based on their beaded record. Needless to say, the kids had a blast with this activity.

Wednesday, December 13, 2006

Audubon's 107th Christmas Bird Count 12/14-1/5

Beginning tomorrow, December 14th the Audubon Society begins its annual Christmas Bird Count. Visit www.audubon.org/bird/cbc/index.html to learn more about this event and how you might be able to participate. What a great way to expose students to the concept of observation and how this data is used by scientists. You might consider setting up a feeder or two around the school to study the winter habits of birds in your area!!

Tuesday, November 07, 2006

Why Do Leaves Change Color in the Fall?

An essential question in the study of leaves is: Why do they change color in the Fall? This is a great way to start a lesson on photosynthesis and the role that chlorophyll plays in the process. Chlorophyll is the green pigment which captures the sun's energy through a complex series of electron transfers in proteins embedded in the thylakoids of the plant cells' chloroplasts. Chlorophyll absorbs the red/yellow and blue/violet wavelengths of visible light and reflects the green wavelengths, hence its green color to the human eye.

In the fall, the cooler temperatures and shorter amounts of sunlight signal the trees that winter's harsh conditions are approaching. The cells at the base of the leaves' stems begin to die. This prevents water which is necessary for photosynthesis from reaching the leaves. As a result, the chlorophyll in the leaves begins to break down and the yellow and orange carotenoid pigments which were present during the entire summer growing season now appear. The deep red color in leaves comes from anthocyanin pigments which are formed when there are cooler temperatures and photosynthesis slows.

You can see these pigments for yourself by using paper chromatography. Simply gather some fallen leaves, crush them in a glass and mix with either ethyl alcohol or acetone. Attach a strip of coffee filter, paper towel, or chromatography paper to a pencil so that the end of the paper touches the surface of the liquid. The paper/filter will absorb the liquid, and the pigments will travel up with smaller sized molecules traveling the farthest. This process may take up to an hour. Take the strips out and let them dry on clean paper towels. You can see here in this photo the pigments found in two Red Oak tree leaves. Note the green band of chlorophyll still present in the green leaf and none in the red leaf.

Monday, October 09, 2006

Dawn Dishwashing Liquid Helps the Environment

While clipping coupons from the Sunday paper, I came across an ad for Dawn dishwashing soap and their new campaign to raise the awareness of how Dawn is used to help clean wildlife that have been contaminated by oil. Visit http://www.dawnsaveswildlife.com for more information. There is a list of things that students can do to help the wildlife in the environment such as: properly disposing of motor or cooking oils, recycling plastic bags, proper handling of fishing lines and lures, and cutting up of "six pack" can rings.

While at the Dawn site, I found a link to the International Bird Rescue Research Center (IBRRC). The IBRRC has an emergency response team who travel to areas to help rescue and rehabilitate birds contaminated by oil. I was amazed by the before and after photos of a brown pelican. When we are teaching about ecosystems, we should take the time to discuss the impact that humans have on the environment. This issue could also make a great debate topic for older students: how does our transportation and mishandling of oil products affect the environment and what should we do about it?

Monday, October 02, 2006

National Earth Science Week - October 8-14

National Earth Science Week sponsored by the American Geologic Institute, kicks off in Washington, D.C. this October 8th with the celebration of International EarthCache Day. EarthCaching is an extension of the popular pastime of Geocaching. Geocaching is a mix of hiking, treasure hunting, and high tech. Cachers use a Global Positioning System (GPS) to find hidden caches at coordinates posted on www.geocaching.com. These photos show my family out caching this summer. Often caches are stored in old ammo boxes or "Tupperware" style containers. The cache includes a log book and trinkets to trade.


This year's theme for Earth Science week is "Be a Citizen Scientist." The annual event was established to help encourage stewardship of the Earth. There are some wonderful classroom activities based on the National Science Education Standards found at http://www.earthsciweek.org/forteachers/classroomactivities.html. Learn more about the American Geological Institute at www.agiweb.org. Another great site to visit is www.earthscienceworld.org, check out their Virtual Oil Well Game.
Even the Girl Scouts are getting into Earth Science, EarthCaching, and Geocaching with their Hi Tech Hide & Seek Interest Patch for girls 11-17.

Tuesday, September 26, 2006

What does a seed need to sprout?

Ask students what they think a seed needs to sprout and you may get a variety of responses. In the February 2006 edition of The American Biology Teacher, researchers interviewed K-8 students, asking them to identify plants (interview items included: grass, trees, mushrooms, ferns, bread mold, telephone pole, walking stick insect, seeds, bushes, flowers, and a Venus flytrap) and items needed for plants to grow (sun, lightbulb, water, cereal, bee, plant food, worm, air, oxygen, carbon dioxide, sandwich, and potting soil). Many students classified flowers as plants but not trees, stating that trees form their own group. Most students, regardless of age stated that plants needed sun, water, air, and soil for growth. They were less certain of whether or not plants needed oxygen or carbon dioxide to grow.

"Inquiry with Seeds: To Meet the Science Education Standards" by Krantz and Barrow, in the same issue, focused on pre-service teachers and their experiences in a semester long course in learning to teach science through inquiry. The pre-service teachers developed a lesson plan to study seed sprouting requirements.

Currently, I am enrolled in a graduate course focusing on teaching science through inquiry. My classmates and I are also studying the requirements for seed sprouting. These photos show my samples for germinating seeds without soil and controlling the variable of light. By using the clear plastic cups, students can observe the seed's activity as it sprouts. They also have the advantage of seeing the root structures, something you cannot observe when seeds are planted in soil.

Wednesday, August 23, 2006

Bird Migration - Flyways

While hiking the Riverside Trail at the Montshire Museum of Science, we came along this sign which explains bird migration. The route 91 corridor, from the mouth of the Connecticut River (in the Long Island Sound) to the Canadian border, plays an important role in New England bird migration. This exhibit is aimed at educating the public in the importance of migratory birds (and insects, i.e. the Monarch butterfly) in our environment and the need to protect the environment along these bird flyways. Migratory birds and insects need three distinct environments in which to survive: their winter home, their summer home, and safe "rest stops" along the path from one home to the other. Urban development and mowing along the sides of highways has decreased the number of safe stopping areas, and has limited food resources.

You can visit the Nutty Birdwatcher for more information about birds and migration. This site has maps of North American Bird Flyways, bird identifications, habitat information, feeding suggestions, and a list of further links.

Tuesday, August 22, 2006

Learning While on Vacation

Recently while touring through Vermont for a family vacation, we made a stop at the Montshire Science Museum in Norwich. The entire family agrees that this museum was worth the stop. Inside you will find many hands-on learning activities in the following disciplines: Light and Vision;Sound; Air and Weather; Anatomy; Astromony; Environment; Live Animals; Math, Mechanics and Motion; and Water and Flow. Outside the museum the fun and learning continues. In the Science Park, you will experience what happens when science meets a water park. Plan on getting wet, you definitely need to bring the right clothes in order to fully experience this exhibit. The museum is located on 100 acres of land bordered by the Connecticut River. They have several well maintained hiking trails for you to explore.

I highly recommend taking advantage of museums like this to expose kids to science and to the fun of learning. Learning doesn't only take place in the classroom.
Hiking the River Trail (Above)


(Left) Aerial View from the top floor of the museum building overlooking the The Science Park- where science and water fun meet!

Wednesday, August 02, 2006

Crickets are Nature's Thermometer

With the current heat wave, I have noticed the nighttime cricket chirps more. Why? Remember that old wives tale about counting the cricket chirps to determine the outside temperature? I did. With a little searching for related internet links, I learned that the snowy tree cricket is responsible for the chirping that we hear. According to several sites, the simple formula to determine temperature in degrees Fahrenheit, is to count chirps for 15 seconds and add 39. Or count for 13 seconds and add 40. A more complicated formula is to count the chirps per minute, subtract 40, divide by 4 and then add 50 [(chirps/min-40)/4 + 50]. Visit Dartmouth Chemistry for an even more advanced mathematical explanation of this natural phenomenon, known as the Arrhenius equation. The equation is a function of temperature and can also be used to describe the rate of an ant's walk or the flashing pattern of fireflies.

Tuesday, June 27, 2006

FREE BOOKS!!! July 4th - August 4th

Summer's here and it's time to catch up on your reading. Project Gutenberg is sponsoring the World eBook Fair beginning July 4th and running through August 4th and will be offered the same time next year. Over 300,000 titles will be offered, of those 95% are in the public domain (no longer copyright protected) and the other 5% have been donated by their copyright holders for this event. The books can be downloaded and read on almost any computer and some cellphones and PDAs. The idea behind this project is to give books away, to be copied and shared with others. The sponsors hope to encourage knowledge and battle illiteracy. Gregory Newby of Project Gutenberg, was quoted in the Boston Globe ("Free chapter added to saga of e-books" by David Mehegan) as saying, "It breaks my heart to go into Barnes & Noble and find Jane Austen for sale in a trade format. Where does that money go? It's close to profiteering. No author is getting any money for it. I feel sorry for schools, where kids are now reading Canterbury Tales or Huckleberry Finn, and the schools are spending millions of dollars from their budgets to buy the books. We're giving the stuff away for free."

Bring your PDA or laptop with you on summer vacation and enjoy a good book. You can learn more about Project Gutenberg by visiting their site at www.gutenberg.org.

Friday, June 16, 2006

Internet Field Guide


Yesterday, my son and I fished this little guy out of the swimming pool. What kind of frog is he we wondered? The Internet is such a great tool for home and at school, with a little help from a search engine we came across the National Wildlife Federation's Website which provides online field guides. We searched for frogs in New England and identified our find as a Grey Tree Frog. What is great about this site is not only does it have pictures of the frog in question (the Grey tree frog can be grey or green) but also its voice. The sound (or racket, depending on the time of day) that this frog makes is very distinctive and helped us to identify it.

With that in mind, if you have the opportunity to take your class into the field, bring along some kind of recording devices such as taperecorders and cameras and then search for your finds on the Internet. Great way to get students into the field and to become tech savvy at the same time.

Wednesday, June 14, 2006

Whodunnit-DNA the Secret Code of Life


Continuing with our secret code theme in the Whodunnit class, I presented DNA as the secret code of life. I explained the basics of DNA molecular structure and emphasized the "code" that was created by the 4 different nucleotides. The cipher for our secret code is C=G and A=T (cytosine always pairs with guanine and adenine with thymine in the double helix).

We created this DNA Model using chenille stems (pipe cleaners) and pony beads. The original directions for this activity (see link above) used fishing line or plastic thread in order to make a bracelet, which I thought might not be too interesting for the boys in the class or easy for students with fine motor skill issues. I had the students bend one end of the pipe cleaner so the beads would not fall off while they were working. The Ology site provided a short list of animal and plant gene sequences (the pipe cleaners can hold 40 beads well) which I typed up for the students. The first step was to decode the other strand of DNA using the cipher C=G and A=T. Then the students could chose 4 different color beads assigning one color to each of the 4 nucleotide bases (i.e. in the model shown blue=thymine, orange=adenine, green=cytosine and pink=guanine). The visual aid helped to cement the concept of base pairing, every time I use a pink(guanine) on the other strand of DNA there will be a green (cytosine) to pair up with it when the two strands are placed next to one another. The last step was to twist the two strands together to create the helix.

Saturday, June 10, 2006

Steganography


"Steganography is the technique of concealing the fact that a message ever existed. The most common way to do this is by using secret inks or microdots." (Page 50, from Spy's Survival Handbook written by Laban Carrick Hill, Scholastic c.2003)

Over the years, I have repeatedly tried to find a way to use lemon juice writing with kids without using an open flame to expose the hidden message. I tried the naked light bulb method (according to some resources I looked up today you need at least a 100 watt bulb), and a bright flashlight; neither were successful. Success was found when I read the suggestion to use an iron. This photograph shows a message I created for my class last week, it was left behind as a clue. A couple of students were quick to pick up the idea that a blank piece of paper in the middle of the crime scene might not be blank at all but a secret message. There are several methods for producing secret ink messages. The preceding link lists several methods and I plan on trying out the lemon juice writing revealed by red cabbage liquid. This method would be a great segue into using red cabbage liquid as a acid/base indicator. But that's another blog posting for the future.

Each student produced their own secret message during class. I brought fresh lemons, cut them and squeezed the juice into plastic cups for the kids. Using a Q-tip, the kids wrote their messages, once dry we pressed them with the iron (use a folded towel to cover your table surface, I happen to own a pressing pad a by product of my quilting hobby-handy for taking to sewing classes) using the high setting. Eureka! The messages were revealed.

Friday, June 09, 2006

Chromatography


Chromatography is a method of separating molecules based on size and rate of travel through a medium. For this week's Whodunnit class we used paper chromatography in order to identify which pen was used to sign the birth certificate of the fictional Princess Michaeala who had been kidnapped at birth. The Royal family managed to retain a portion of the original document and the kidnappers absconded with the rest of it. When a young woman resurfaced claiming to be the Princess (I likened it to the animated movie Anastasia that children would be familiar with) the torn document that she possessed would be tested against the existing piece in the Royal archives and the against the original pen used by the Registrar of Births.

Each student was provided with the following evidence sheet on which I had attached a strip of filter paper (coffee filter) with a sample of ink from the Registrar's pen which had been processed by chromatography. The students were then given three samples to test in order to find the matching ink pattern. In a clear plastic cup, I placed a half inch of acetone nail polish remover and the students placed their samples. We allowed the samples to rest for 10 minutes. The capillary action of the filter paper did the rest. Students removed their samples and placed them on wax paper (to protect desk surfaces) to dry. Then they compared the samples to the one provided and made a match. The documents in question were a match, no case of forgery. But is the Princess herself the real thing. That will bring us to the next topic, DNA testing.

Saturday, June 03, 2006

More Secret Codes

We continued working with secret codes this week in Whodunnit? I introduced the classic alpha-numeric substitution code but with a twist. The cipher key showed a table with A=1, B=2 all the way to Z=26, however the code itself showed a number problem in parentheses such as (4+3) which equals 7 and therefore stands for the letter G. For example the word cat would be (2+1)(5-4)(10+10). You could create a variety of math fact problems for each letter of the alphabet using addition, subtraction, multiplication and division depending on your grade level.

Thursday, May 25, 2006

Whodunnit? - Week 2


Here is the crime scene for our second class, a case of Industrial Espionage in the test kitchen of a famous cookie manufacturer. The kids quickly noticed that a break in had occurred, that the safe with a coded message inside had been accessed with the tools left behind by the culprit. It's harder to see but on the table is an Alberti Cipher Wheel and on the floor a package of chocolate chips with R=G written on it with black marker.

We discussed the history of secret messages and tried our hand at a grid cipher (check out the NSA's site for kids for some great information on this topic). Then we constructed our own cipher wheels and went to work on decoding the secret message from the safe. The kids really enjoyed this activity. We may try some other kinds of ciphers next week.

Friday, May 19, 2006

Whodunnit? Week 1

I started a new unit entitled Whodunnit? which mixes activities centered around forensic science and the study of the Mystery genre. In searching the web for classroom ideas I found Whodunnit and decided to pattern a class after this site. I created the crime scene below for the students to study and process (my apologies to Yankees fans, but it is a crime in Massachusetts to be a Yankee fan). Pictured is some graffiti, a spray paint can, a hat, a pair of gloves, a newspaper clipping of the Red Sox which has been defaced, a sweat shirt, soda cans, candy wrappers and a set of keys. I asked the students what they thought had happened and who might be responsible. They had some great ideas. The hat, gloves and sweatshirt were worn because the perpetrator rode a motorcycle. He/she is a Yankee fan and hates the Red Sox. The perpetrator has been to Hawaii because the key chain is from there. He/she liked to eat candy and drink soda. All great observations.

Then we proceeded to process the crime scene. First we took photographs. Then I gave the students a sheet of paper with a grid (very conveniently, the floor is tiled and I taped off the exact number of corresponding squares) for them to draw out the crime scene. Then I had the students take turns coming into the crime scene with me to measure the distances between the items. Lastly, the students made labels (date, item, and detective's name) and we bagged up the evidence.

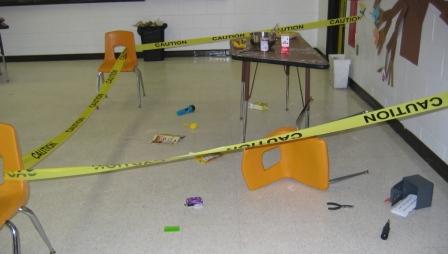
With the crime scene sheets we can work on some math concepts. The grid can be numbered and we will be able to talk about coordinate planes (i.e. at what coordinate pair is the spray can?) as well as use the measurements to create math problems (which two items are the furthest away or closest? What two items are 17 inches apart?).

Wednesday, May 10, 2006

Endangered Species Day May 11th - Update

In the most recent online newsletter of the National Association of Biology Teachers (NABT) I have found a link for Endangered Species Day to share with you. You will find a variety of useful information, activities, and print outs. Enjoy celebrating this important day with your class.

Monday, May 08, 2006

Count Down to the End of the School Year

Now that we are into the second week of May, summer vacation doesn't seem so far away anymore. My daughter's math teacher has counted down the days since day one. Last week, I substituted for a 5th grade teacher who has a great twist on counting down the days. On the first day of school he represents the day as 1/180, the second day is 2/180 or reducible to 1/90, and so on. Each day the students calculate the fraction of the school year completed. Mr. M. has each of the fractions listed on the wall. Today was the 151st day of the year, as a fraction of the total it is 151/180 and is not reducible. Great way to build math skills!

Tuesday, May 02, 2006

May 11th Endangered Species Day

Endangered Species Day is May 11th and here is an idea for studying about these animals. Recently my Cub Scout den earned their Wildlife beltloop, and we discussed the difference between endangered and extinct animals. We placed the boys into small groups and had them research an endangered animal and answer the following questions: where does this animal live, why is this animal endangered and what are people doing to help preserve this animal?
My co-leader Joanne then explained a game that she and her sons created one night at the dinner table. They were eating hot dogs made from turkey, beef and pork and Joanne wondered what kind of animal that is. They create the "beorky," a black and white spotted, pig headed and tailed, tiny winged creature that stood on two turkey like legs. This creature's call is "wobloink," it can perch in trees and beware of the cow patty-like excrement. So we asked the boys to choose two to three endangered animals and combine them to create a new creature. They then had to choose its name, call, habitat, diet and to draw a picture of what it would look like. Below is a "progzly" a cross between a panda, grizzly bear and cougar. It lives in temperate woodlands, eats salmon skewed on bamboo and makes a "GURRRRRRRRRRRRRRRRRRRRRRR!" sound. (Drawing by my son Matt)

Monday, April 24, 2006

Earth Day Update

I had clipped a list of Earth Day sites from the Boston Globe's weekly column Surfing the Net with Kids and couldn't find them the other day. In cleaning up my pile today I unearthed them just like a good archeologist would. Here they are since you could use some of them any day of the year.
  1. EcoKids- a site from Canada's youth education program about the environment.
  2. Kids Domain: Earth Day- this site gives a history behind the creation of Earth Day as well as games, activities, clip art and more.
  3. Kids for Saving the Earth- this is a environmental kids' club created by Clinton Hill before his death from cancer at the age of 11. His mother is carrying on his mission to get kids involved in saving the planet.
  4. NASA: Earth Science Enterprise: For Kids Only- NASA has created this site with information, lesson plans and games for teachers and students.
  5. The Wilderness Society: Earth Day- photojournalist John Dunne's study of the Arctic Wildlife Refuge in Alaska.

Let's face it everyday should be Earth Day!

Sunday, April 23, 2006

commenting and trackback have been added to this blog.

Gum Drops and Toothpicks - Squares vs. Triangles


Recently in my after school Science with Everyday Objects class we tried out some engineering experiments. We discussed using squares versus triangles as basic building blocks for structures. Then the kids created their structures and we tested how well they could bear weight. We used books and toy cars as weights. The strongest structure held 6.5 pounds (as weighed on a kitchen scale)and could have gone on except we ran out of toy cars to pile on top. Then we tried spaghetti and marshmellos. Not as successful. The spaghetti was too brittle and broke when they tried working with it. The kids still had fun trying. See ZOOM for this and other building project ideas.

Ethanol Gasoline Additives

Today I filled my car for the first time with gasoline with the new Ethanol additive and started wondering how you could study this in the classroom. I went searching for information on the Web and here are a couple of good websites I found.
  1. How Stuff Works - explains what gasoline additives are and their history starting with lead
  2. Department of Energy - good description of ethanol and where it comes from

You can also do some neat experiments with Yeast (the producers of ethanol). Yeast are an important class of fungi and very helpful to humans. There are many other products besides ethanol that they help to produce (bread, yogurt, and cheese to name a few). Check out the following sites.

  1. Yeast Experiments - for older students
  2. KidWizard - for younger students and a way to study other by products of the fermentation process (i.e. carbon dioxide).
  3. Herbarium - a similar experiment to the one above but with a twist. This experiment also provides a control sample. Put a drop of each solution on a microscope slide with some stain and compare the number of colonies from each sample.

Lastly, if you want to do some math related activities why not chart gasoline prices over a period of time (introduce students to Excel or other spreadsheet programs). Try to discover why there is such a fluctuation in prices (weather, war, politics, increase use due to summertime travel).

Saturday, April 22, 2006

National DNA Day

April 25th is National DNA Day celebrating the completion of the Human Genome Project and the 50th anniversary of the description of DNA's double helix. There will be online Webcasts from the National Human Genome Research Institue see http://www.genome.gov/DNAday.

Classroom ideas for studying DNA:

  1. visit TryScience:
    http://www.tryscience.org/experiments/experiments_begin.html?dna
  2. visit Origins at Exploratorium:
    http://www.exploratorium.edu/origins/coldspring/index.html
  3. visit OLogy at the American Museum of Natural History:
    http://ology.amnh.org/genetics/index.html - this site includes several ideas for off-line projects to do in the classroom like DNA in a blender and a DNA model.

Girl Scouting-Studio 2B has a new interest patch which includes an activity for extracting DNA from fruit which you can do in the kitchen (or classroom for that matter). See http://www.studio2b.org/lounge/gs_stuff/ip_evidence.asp for activity directions.

Friday, April 21, 2006

Earth Day 2006

With Earth Day coming up, my Cub Scout den recently participated in our town's annual Spring Clean-Up. To extend the boys' learning about the impact of pollution on our environment we read Lynne Cherry's A River Ran Wild, the history of the Nashua River which runs through our community. (Lynne's site is http://www.lynnecherry.com and she has several other nature related titles.) You can visit http://www.nashuariverwatershed.org to learn more about this environmental project.
In the classroom students can learn more about the Clean Air and Clean Water Acts by visiting http://www.epa.gov/r5water/cwa.htm for older students and http://www.epa.gov/kids for elementary aged students.
There are many ways for students to extend their learning of how pollution impacts our lives and health. Some research topics could include: increasing asthma rates in urban areas, ground water contamination, communities with unusually high cancer rates, the impact of bottle bills, recycling efforts and products made from recycled materials, global warming, alternative fuels, and the list goes on.
It is important to remind students that science isn't only something to study, but something to be lived.